- System Settings Part One: information part >>
- System Settings Part Two: School Information >>
- System Settings Part third : Two factor authentication
- System Settings Part fourth,: Security Accounts
- System Settings Part fifth: Content Sharing Settings:
- System Settings Part sixth: Chat Settings:
- To Disable a Chat Between Two Categories : #
Home Page Settings
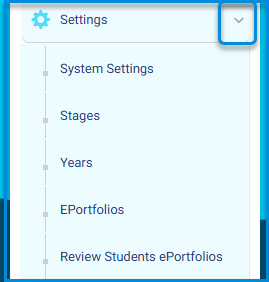
The settings page includes entries for various tabs to control the platform and user settings. You can access the settings page:
- From the main menu, press Settings.
- The different tabs under the settings page:
With settings, all of your schools are under control as the Settings page includes various tabs to control your LMS system.
Main Menu >> Settings Setting’s Page Tabs:
- System settings
- Stages
- Years
- EPortfolios
- Review Students E-Portfolios
System Settings Part One: information part >> #

The first part of the system setup files contains a summary view of the main data of the platform licenses for schools under your management or within your scope as shown in the picture from the number of available and basic licenses, etc.
System Settings Part Two: School Information >> #
This part includes general information about the school.
- General information about the school:
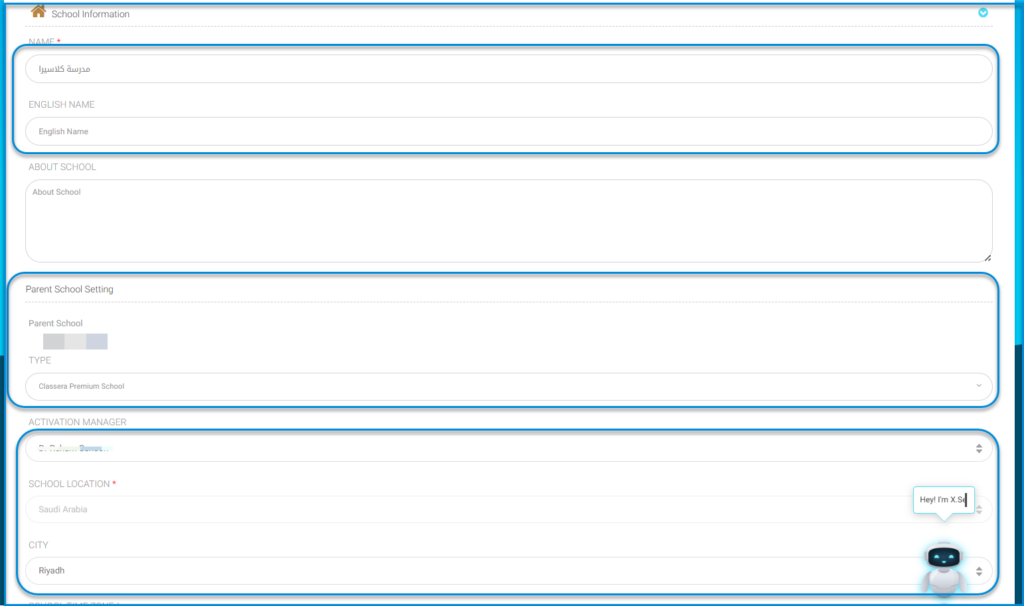
- Type of school
- School name
- Name in English or any other language as you wish it to appear since the language can of course be changed.
- About the school: A brief description of the school can be entered to appear on its homepage on the platform.
- Display the school’s location, the city it belongs to, the parent school, and its time zone.
- School status toggle button: Pressing it toggles the school’s status from active to inactive and vice versa.
- School logo: To upload the logo click the “Choose File” button or drag it to the box. Note: Please note that the optimal image size is 238 pixels in width and 84 pixels in height.
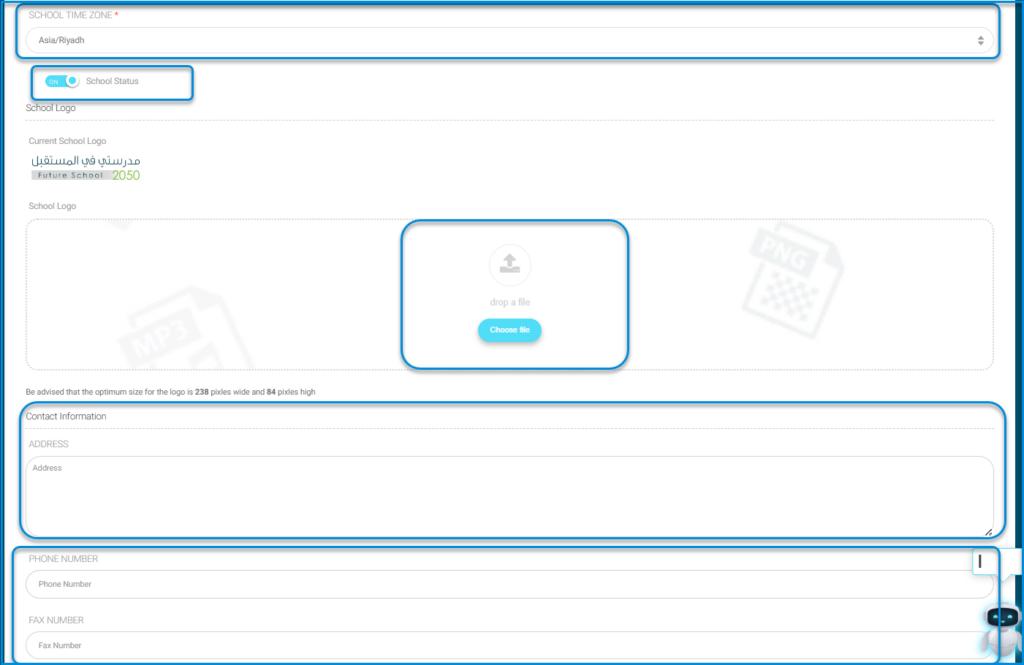
- General Settings: Includes the general settings of the school such as (language, gender of students, social media accounts) that appear in the public profile of the users.
- Contact Information
It includes the basic contact information of the school. Address – Phone numbers – Fax – Email – Website
- General Settings
It includes the general settings of the school such as (the language, gender of students, and social media accounts) that appear in the public profile of the users.
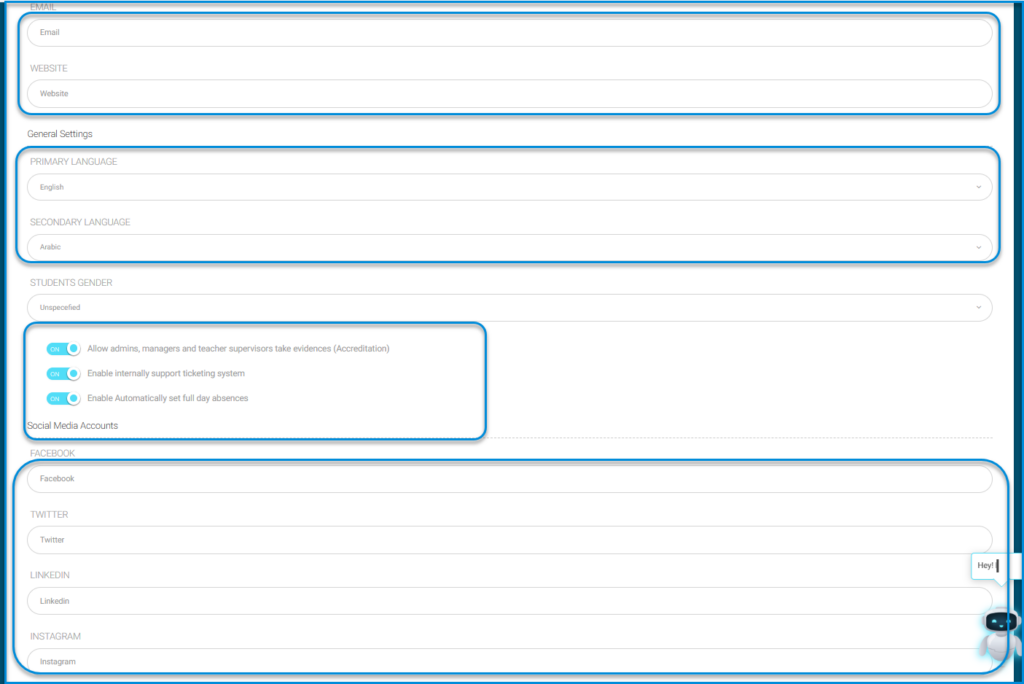
- Select the system’s primary language from the “Primary Language” dropdown menu, which appears by default to users, let it be English.
- Select the secondary language, which users switch between it and the primary, let it be Arabic. Note: The system offers many languages to provide for all user needs and to facilitate work.
- To enable some services and permissions for users, press the following toggle buttons:
- Academic Accreditation System: Allows system administrators, school managers, and supervisors to obtain academic accreditation in the system to train educational staff and ensure they are well versed in all the distinctive services and features of the platform, which in turn reflects on the employees and students.
- Internal Technical Support: A distinctive feature of the platform, and its activation benefits all stakeholders from students, parents, to all employees to raise complaints, suggestions, or contact for any inquiries with the system manager and technical support.
- Enable Automatically set full day absences:
System Settings Part third : Two factor authentication #

System Settings Part fourth,: Security Accounts #

- When entering the value “zero” in the field “Number of concurrent sessions per account”; this means that the student can access their account on the platform through more than one device, such as a mobile, computer, and tablet for example, as the value zero means access from an unlimited number of devices. If you set the value “1”, this means that the student cannot access the system except using one device only.
- Toggle button “Allow weak password”: Activating it means allowing students to enter a weak password and it is not mandatory for students to create it such that the password consists of any combination of letters, numbers, and symbols (only regular ASCII characters), and the opposite is true.
System Settings Part fifth: Content Sharing Settings: #

System Settings Part sixth: Chat Settings: #
Through the chat settings section, you can enable chat settings at the system level or in a customized manner.
- Enabling the toggle button “Allow chat on the school level” shows the chat icon at the level of the school as a whole.
- Click the “Chat Settings” button, a dialogue box with the same name appears:

To Disable a Chat Between Two Categories : # #
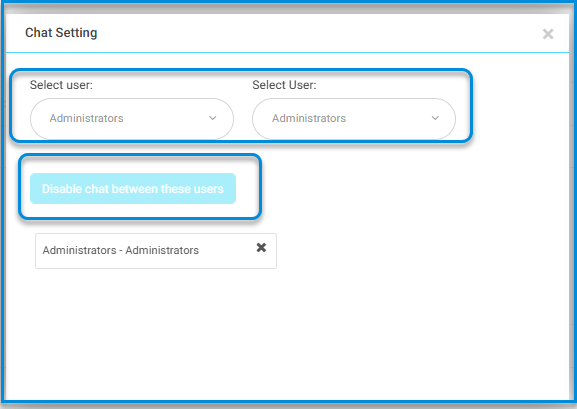
- Click the Chat Settings button on the System Settings page.
- Select the two user categories from the drop-down list.
- Click the Disable chat between theses users button.
- If you want to undo your action anytime, click the x mark to remove it.


